Discovering a tick on your precious puppy is a heart-dropping moment for any pet parent. These tiny parasites are more than just creepy; they are potential vectors for serious diseases like Lyme disease. For a vulnerable puppy with a developing immune system, the risks are even greater. But panic is not a plan. Knowing how to respond calmly and effectively is your first line of defense.
This comprehensive guide will equip you with the knowledge you need to handle these unsettling situations. We’ll cover exactly how to safely remove a tick from your puppy, step-by-step, what to do after it’s out, and how to recognize the critical signs of Lyme disease and other tick-borne illnesses. Most importantly, we’ll detail how to build a powerful prevention strategy to keep your furry friend safe and tick-free.
Why Ticks Are Especially Dangerous for Puppies 🚨
While ticks are a threat to dogs of all ages, puppies are particularly susceptible for a few key reasons:
- Developing Immune Systems: A puppy’s immune system is not yet fully mature, making it harder for them to fight off the pathogens that ticks can transmit.
- Small Size: A smaller body mass means that the same amount of pathogen or blood loss from a tick bite can have a more significant impact on a puppy than on an adult dog.
- Lyme Disease Risk: Puppies can contract Lyme disease just like adult dogs. The bacteria (Borrelia burgdorferi) is transmitted through the bite of an infected black-legged tick (deer tick).
Step-by-Step: How to Safely Remove a Tick from Your Puppy 🛠️
Finding a tick is stressful, but safe removal is straightforward with the right tools and technique. Do not use folk remedies like vaseline, nail polish, alcohol, or a hot match. These can aggravate the tick, causing it to regurgitate saliva and pathogens into your puppy’s bloodstream, increasing the risk of disease.
What You’ll Need:
- Fine-tipped tweezers or a dedicated tick removal tool (like a Tick Key or Tick Twister)
- Disposable gloves
- Rubbing alcohol or antiseptic wash
- A small container or zip-top bag (optional)
- Treats for your brave puppy!
The Safe Removal Process:
- Stay Calm & Get Ready: Put on your gloves. Have your tools and supplies within reach. Ask a family member to gently hold and soothe your puppy if needed.
- Part the Fur: Use your fingers to carefully part your puppy’s fur so you have a clear view of the tick and where it is attached.
- Grasp the Tick: Using your tweezers or removal tool, grasp the tick as close to your puppy’s skin as possible. Aim for the tick’s head/mouthparts.
- With Tweezers: Grasp firmly but gently. Avoid squeezing the tick’s engorged body.
- With a Tick Tool: Slide the notch of the tool under the tick, against the skin.
- Pull Steadily: Using steady, even pressure, pull straight upward. Do not twist or jerk, as this can cause the mouthparts to break off and remain in the skin.
- Clean and Disinfect: Once the tick is removed, clean the bite area thoroughly with rubbing alcohol or an antiseptic wash. Wash your own hands with soap and water.
- Dispose of the Tick: Submerge the tick in rubbing alcohol, place it in a sealed bag/container, wrap it tightly in tape, or flush it down the toilet. Do not crush it with your fingers.
- Reward Your Puppy: Give them lots of praise and a treat! This helps make the experience less traumatic.
What If the Head Gets Stuck? 🤔
If the tick’s mouthparts break off and remain in the skin, don’t panic. You can try to remove them with clean tweezers, but if you can’t get them easily, leave it alone. Do not dig into the skin. Gently clean the area and monitor it. Your puppy’s body will likely expel the remaining parts or wall them off, much like a splinter. If you see signs of infection (redness, swelling, pus), contact your veterinarian.
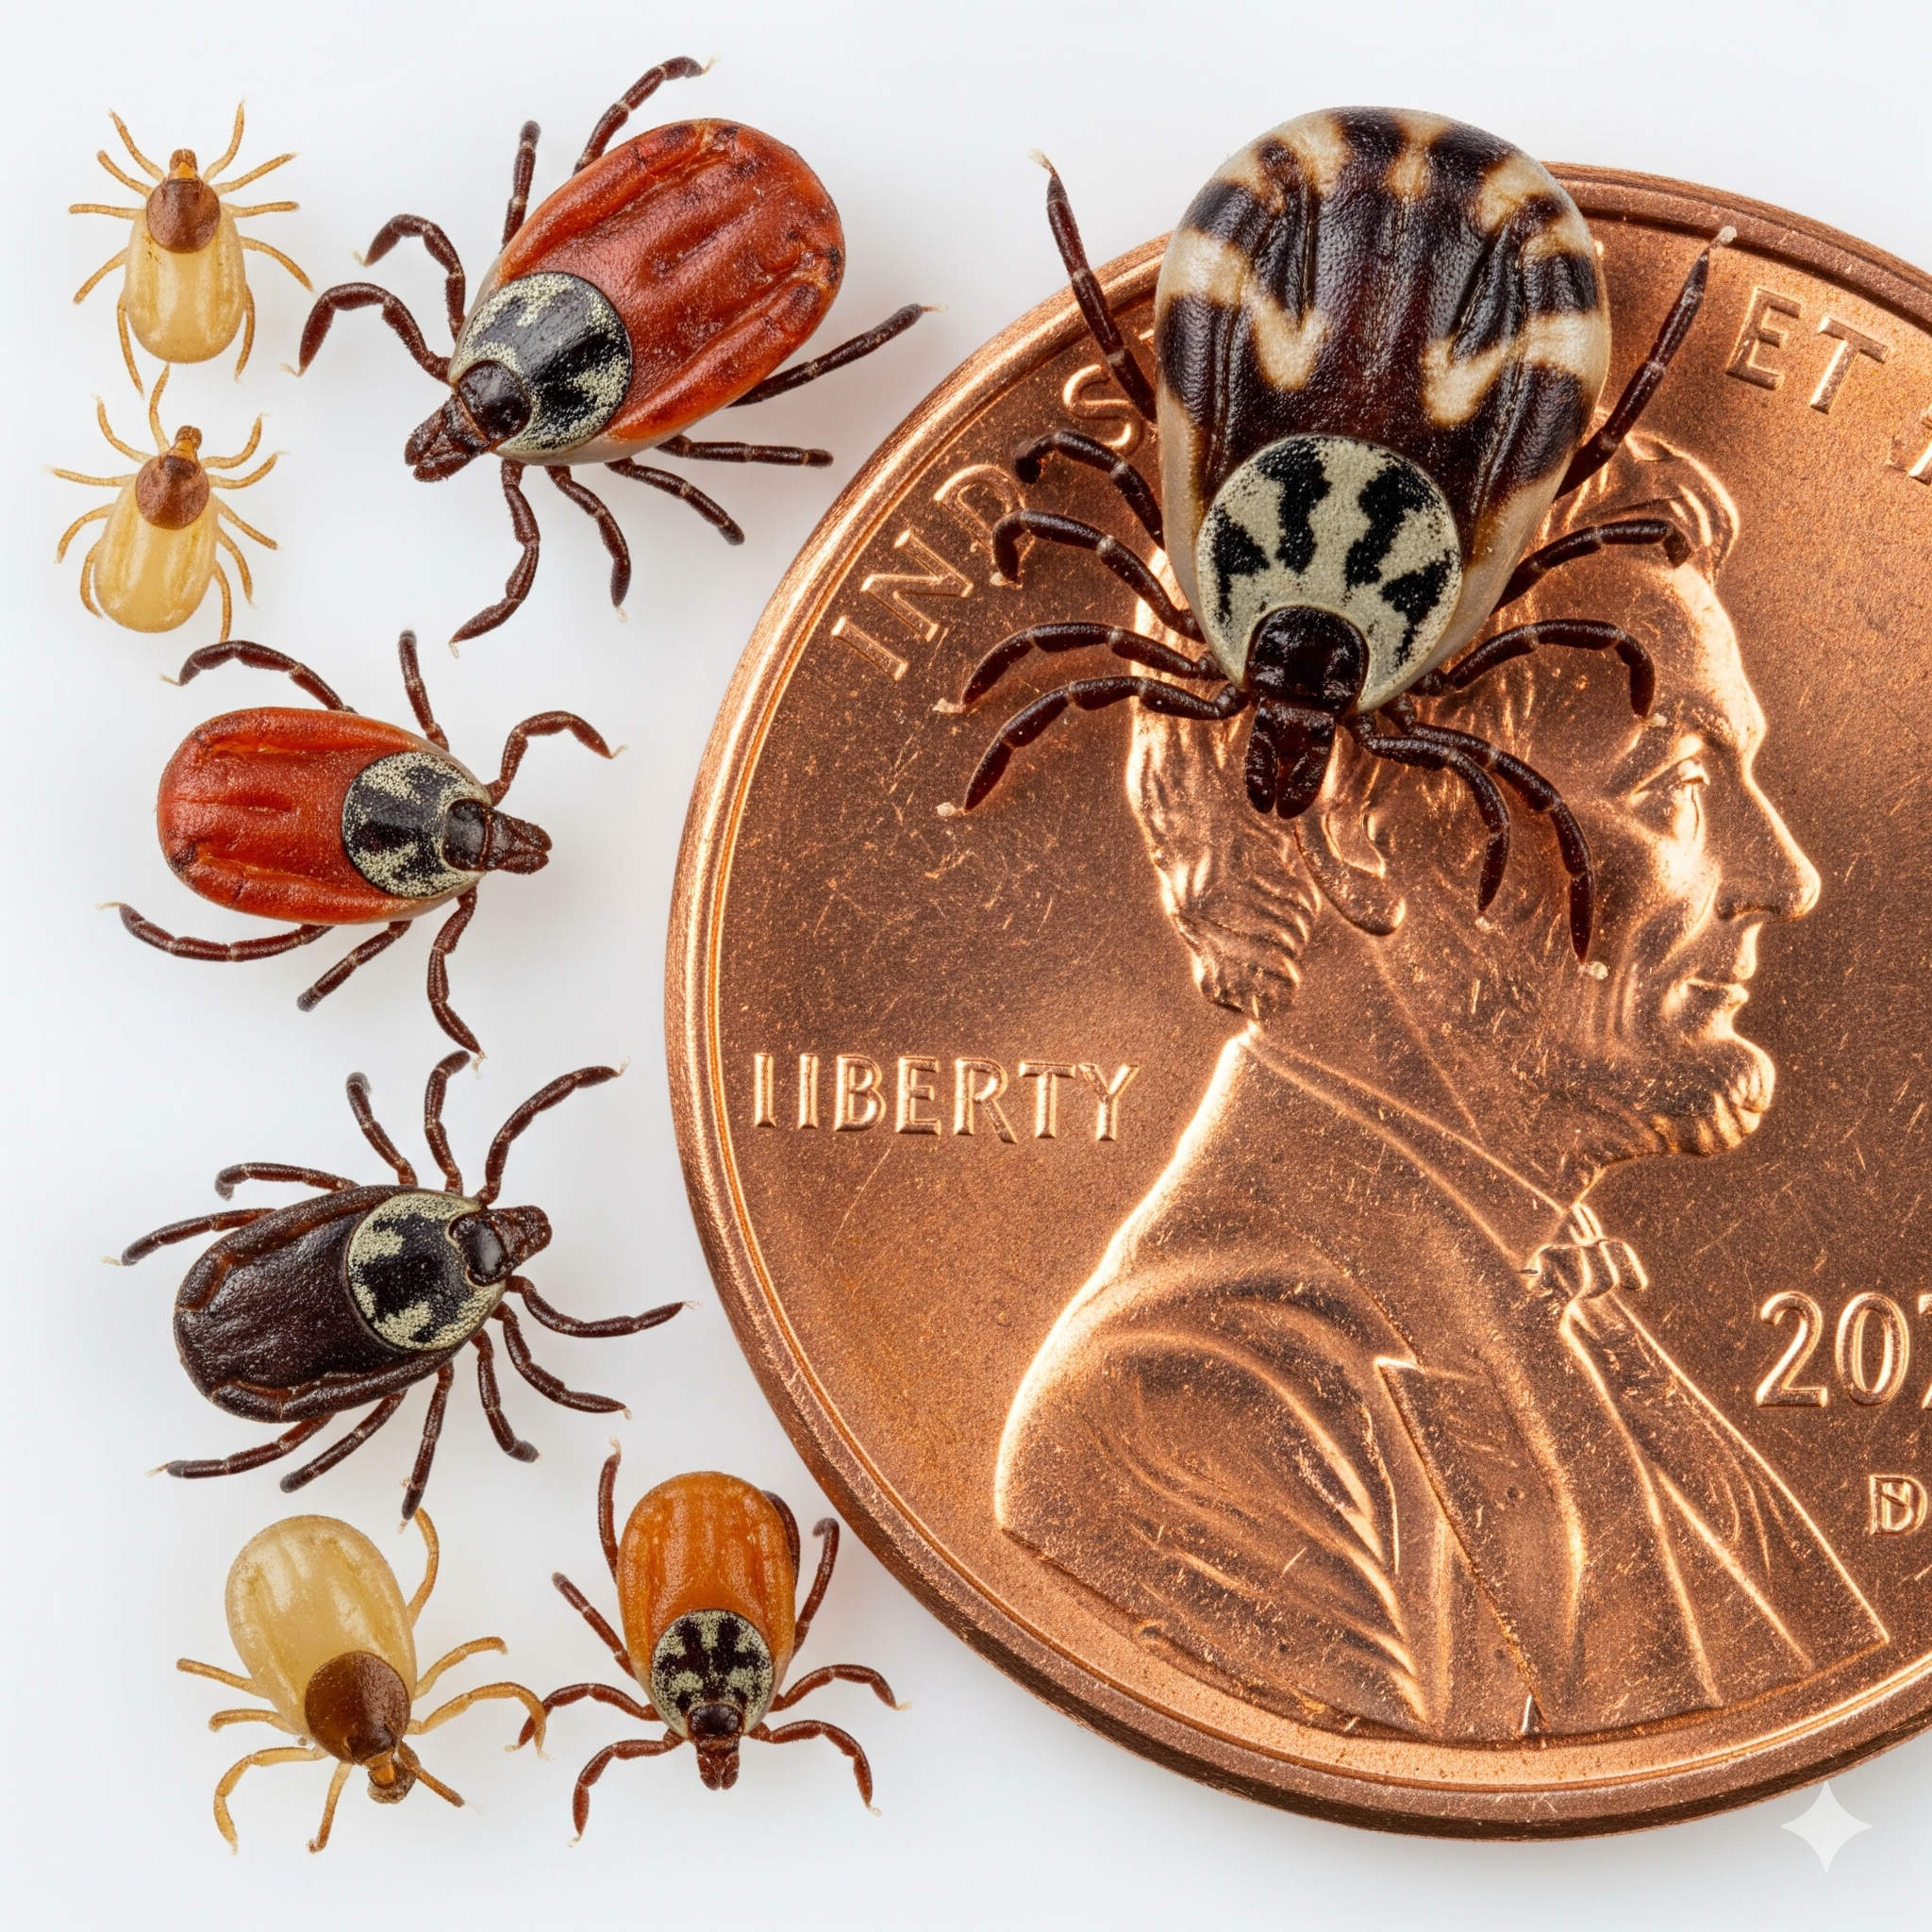
Identifying Ticks and Understanding Lyme Disease 🦠
<H3>Common Ticks to Look For</H3>
- Black-Legged Tick (Deer Tick): The primary vector for Lyme disease. They are very small (about the size of a sesame seed) and reddish-brown with black legs.
- American Dog Tick: Larger and more common. They are brown with whitish-gray markings. They can transmit Rocky Mountain Spotted Fever.
- Lone Star Tick: Identifiable by a single white dot on the back of adult females. They can transmit several diseases.
The Lyme Disease Threat
Lyme disease is not transmitted instantly. A tick typically needs to be attached and feeding for 24 to 48 hours to transmit the Borrelia bacteria. This is why daily tick checks are your most powerful tool for prevention.
Critical Signs: Symptoms of Lyme Disease in Puppies 🚩
After removing a tick, monitor your puppy closely for the next several weeks. Many dogs infected with Lyme disease show no immediate signs, but symptoms can include:
- Limping/Lameness: This is the most common clinical sign. It may be shifting from one leg to another and can seem intermittent.
- Swollen Joints: Joints may be warm, swollen, and painful to the touch.
- Lethargy: A sudden lack of energy and reluctance to play or move.
- Loss of Appetite: Not interested in food or treats.
- Fever: A high temperature (over 103°F).
Important: In rare cases, Lyme disease can progress to serious kidney damage (Lyme nephritis). Signs include increased thirst and urination, lack of appetite, vomiting, and weight loss. This is a medical emergency.
If you notice any of these symptoms, contact your veterinarian immediately. Tell them about the tick bite and when it occurred.
What to Do After Removing a Tick: Monitoring and Testing 🔍
- Save the Tick (Optional but Recommended): Place the dead tick in a zip-top bag with a moist cotton ball and label it with the date. Your vet may be able to identify it or even send it to a lab for testing to see if it was carrying diseases.
- Monitor the Bite Site: A small, red bump is a normal reaction to a tick bite and should subside in a day or two. Contact your vet if the redness expands, persists for days, or looks like a “bull’s-eye” rash (though this is less common in dogs than humans).
- Talk to Your Vet: If you live in a high-risk area for Lyme disease, your vet may recommend testing your puppy for tick-borne diseases 4-6 weeks after the bite. They may also discuss the pros and cons of prophylactic antibiotics.
Building a Fortress: Tick Prevention for Puppies 🛡️
- Veterinary-Recommended Preventatives: This is your #1 defense. Options include:
- Topical Solutions: Applied to the skin between the shoulder blades monthly.
- Oral Chewables: Given monthly or every 3 months. These kill ticks that bite your puppy.
- Tick Collars: Provide long-lasting protection but must be fitted properly.
⚠️ Crucial Warning: Never use a tick preventative meant for adult dogs or cats on your puppy. The dosage is different, and some ingredients are toxic to young puppies. Always use a product approved for your puppy’s specific age and weight by your veterinarian.
- Daily Tick Checks: Make it a habit. Run your hands over your puppy’s entire body after they’ve been outside, paying close attention to the ears, neck, skin folds, armpits, and between the toes.
- Landscape Management: Keep your grass mowed short, clear brush, and create a wood chip or gravel barrier between your lawn and wooded areas to make your yard less tick-friendly.
Final Thoughts: Vigilance is Love 💚
Finding ticks on puppies is an unfortunate reality of pet ownership in many areas. But armed with the right knowledge, you can move from panic to empowerment. By performing daily checks, knowing how to remove ticks safely, understanding the signs of Lyme disease, and—most importantly—using a vet-recommended preventative, you are taking proactive steps to protect your puppy’s health. Your vigilance ensures they can enjoy the great outdoors safely for years to come.
Border Collies are often considered the most intelligent dog breed, capable of learning a remarkable number of commands and tricks. However, this intelligence comes with extremely high energy needs and a requirement for constant mental stimulation. Success with this breed isn’t just about general puppy training; it’s about meeting their unique physical and psychological requirements. Without proper outlets, they can develop destructive behaviors. For a complete guide tailored to this breed’s specific needs, from advanced mental games to structured exercise routines, read our dedicated resource on Border Collie Puppy Training & Energy Needs.