
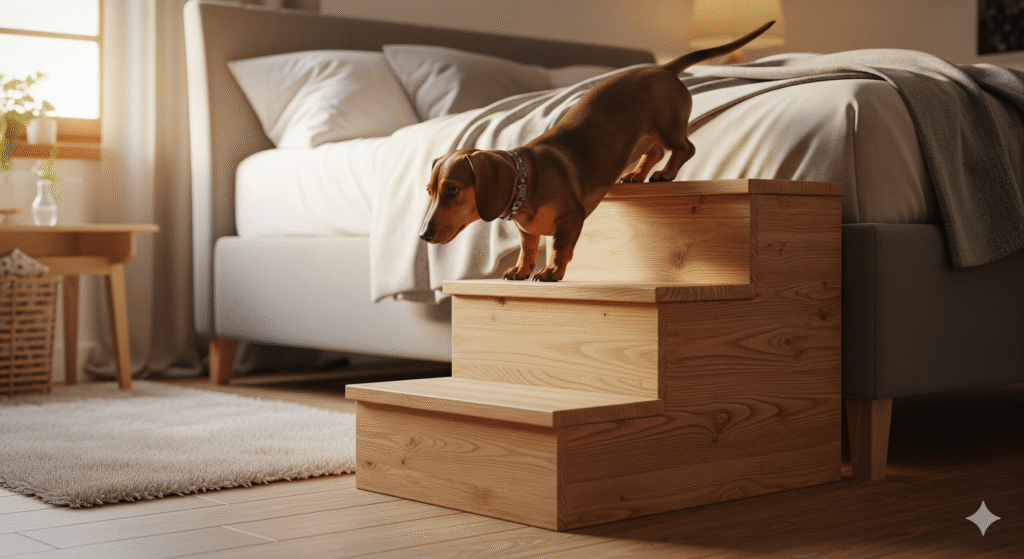
There’s nothing quite like the joy of cuddling with your small puppy on the couch or having them snooze at the foot of your bed. But for tiny breeds like Dachshunds, Chihuahuas, or French Bulldogs, jumping up and down from furniture is a serious health hazard. It can strain their developing joints, injure their spines, and lead to long-term issues. The solution? A set of diy puppy stairs.
Building your own pet stairs isn’t just a fun weekend project; it’s an act of love that protects your furry friend. This comprehensive guide will walk you through the why, the how, and the must-know safety tips for creating the perfect homemade dog steps for your small companion.
Why Your Small Puppy Needs Stairs: More Than Just Convenience 🏥
While it might seem like a luxury, puppy stairs are a crucial tool for responsible pet ownership, especially for small and long-backed breeds.
- Joint and Spine Protection: 🦴 Puppies’ bones and joints are still developing. The repeated impact of jumping down from a height can cause micro-injuries that accumulate over time, leading to early arthritis, disc disease, or even devastating injuries like IVDD (Intervertebral Disc Disease) in breeds like Dachshunds.
- Preventing Emergency Accidents: A misjudged jump can result in sprains, fractures, or other traumatic injuries that require immediate and expensive veterinary care.
- Building Confidence: Some puppies are naturally hesitant or fearful of heights. DIY puppy stairs provide a safe, gradual way for them to access their favorite spots, boosting their confidence and independence.
- Aging in Place: Teaching your dog to use stairs while they’re young establishes a lifelong habit. As they age and their mobility decreases, they will already be comfortable using this safer alternative to jumping.
Planning Your DIY Puppy Stairs: Key Design Considerations 📐
Before you pick up a saw, a little planning ensures your stairs are safe, functional, and aesthetically pleasing.
1. Stairs vs. Ramp: Which is Better?
- Stairs: Generally easier for most dogs to use and require less space (a shorter overall length). They are also typically easier to build for a DIY beginner.
- Ramp: Better for dogs with severe joint issues, very long backs, or those who are hesitant to navigate steps. Requires a longer, gradual incline to be effective.
For this project, we’ll focus on stairs, as they are the most versatile and common solution.
2. Critical Measurements
- Total Height: Measure from the floor to the top of the furniture (e.g., the top of the mattress or couch cushion).
- Rise & Run: The rise is the height of each step. The run is the depth of each step.
- Ideal Rise: For a small puppy, each step should be no more than 6-8 inches high.
- Ideal Run: Deep enough for your puppy to comfortably place all four paws. A 10-12 inch run is a good target.
- Width: Make the stairs wide enough for your puppy to turn around comfortably. A width of 12-16 inches is usually sufficient.
- Number of Steps: Divide your total height by your desired rise to calculate the number of steps. (e.g., A 20-inch high bed / 6.5-inch rise = ~3 steps).
3. Choosing the Right Materials
- Wood: The best material for diy puppy stairs. It’s sturdy, stable, and customizable.
- Plywood: Excellent for the main structure (sides, steps). Use ½” or ¾” thickness for sturdiness.
- Pine or Poplar: Good for adding decorative trim or facades.
- Carpet or Non-Slip Material: This is non-negotiable. The surface of each step must be covered with a non-slip material to provide traction and prevent your puppy from slipping and getting scared.
- Tools You’ll Likely Need:
- Saw (a circular saw or jigsaw works well)
- Drill & Screws
- Wood Glue
- Sandpaper (medium & fine grit)
- Staple Gun (for attaching carpet)
- Measuring Tape & Pencil
- Safety Glasses
Step-by-Step Guide to Building Simple & Sturdy Puppy Stairs 🛠️
Here is a guide for building a classic three-step design. Adjust the dimensions to fit your needs.
Step 1: Cut the Side Panels (Stringers)
The stringers are the two side pieces that support the steps.
- On a large piece of ½” plywood, mark out your staircase shape. Using your calculated rise and run, draw the step pattern.
- Carefully cut out the first stringer with a saw.
- Use this first stringer as a template to trace and cut an identical second stringer. This ensures both sides are perfectly symmetrical.
Step 2: Cut the Steps
- Cut rectangular pieces for each step from your plywood. The width should match your desired stair width, and the depth should match your run measurement.
- For added strength, you can also cut smaller support blocks to glue and screw under the steps where they meet the stringers.
Step 3: Assemble the Frame
- Dry Fit: Place the steps on the ledges of the stringers to ensure everything fits.
- Glue and Screw: Apply wood glue to the supporting edges of the stringers. Place a step on top and secure it by drilling pilot holes and driving screws from the outside of the stringer into the step. For extra strength, also screw from the top of the step down into the stringer.
- Repeat for all steps. Attaching the bottom step first can make the structure more stable as you work.
Step 4: Sand, Sand, Sand!
This is the most important step for safety. 👐
- Thoroughly sand every surface, edge, and corner of the stairs until they are completely smooth to the touch. You want to eliminate any risk of splinters.
Step 5: Add Non-Slip Traction
- Option A (Carpet): Cut pieces of low-pile carpet to fit each step. Use a staple gun to securely attach it, pulling it taut. Ensure all staples are firmly in place and can’t be scratched loose.
- Option B (Non-Slip Tape): For a simpler look, you can apply wide, gritty anti-slip tape (like the kind used on stair treads) to each step.
Step 6: Finishing Touches (Optional)
- You can leave the wood natural, paint it with pet-safe, non-toxic paint, or apply a clear sealant to match your home’s decor.
Puppy Stairs Safety: The Non-Negotiable Rules ✅
A poorly built stairway can be more dangerous than no stairs at all.
- Stability is Paramount: The stairs must not wobble, tip, or slide when in use. If needed, attach a small lip of wood to the bottom front to prevent sliding, or secure the top to the furniture (if possible).
- No-Slip Surface: We cannot stress this enough. Non-slip material on every step is essential.
- No Sharp Edges: Meticulous sanding prevents cuts and splinters.
- The Right Height: Stairs that are too steep defeat the purpose. Ensure the rise per step is appropriate for your puppy’s size.
Training Your Puppy to Use Their New Stairs 🐾
Patience and positive reinforcement are key.
- Introduce: Place the stairs securely against the furniture and let your puppy investigate them on their own terms.
- Lure: Use high-value treats to lure them onto the first step. Praise and reward heavily.
- Climb: Hold a treat at the top of the stairs to encourage them to climb all the way up. Again, massive praise and rewards!
- Descend: This is often scarier for puppies. Lure them down one step at a time with treats, rewarding each successful step down.
- Practice: Keep training sessions short, fun, and positive. Never force your puppy, as this can create a negative association.
Conclusion: A Project Worth Every Minute
Building diy puppy stairs is a rewarding project that pays dividends in your pet’s health and happiness. By investing a few hours and some basic materials, you create a tool that protects your puppy’s body, enriches their life, and ensures many more years of safe cuddles on the couch. It’s a simple build with a profound impact.
From choosing organic food to using non-toxic cleaning products, many owners are seeking ways to reduce the chemical load on their puppies. An often-overlooked area is grooming products, which are absorbed through the skin and licked off during grooming. Making the switch to natural alternatives for shampoo, conditioner, and even paw balms can have a positive impact on your puppy’s overall health. If you’re ready to take the next step in creating a natural lifestyle for your pup, a great place to start is in the bath. Learn how to create a safe, effective, and simple cleanser with our recipe for Homemade Puppy Soap (Gentle Formula).