
The click-clack of overgrown nails on the floor is a sound every puppy owner knows. While it might seem like a small part of grooming, learning how to trim puppy nails is one of the most important skills you can master. Long nails can cause pain, alter a puppy’s gait, and lead to long-term joint issues. But for many, it’s a dreaded task filled with wiggling, whining, and the fear of cutting the quick.
It doesn’t have to be a battle. With patience, the right tools, and a positive approach, you can teach your puppy to accept—and even enjoy—nail trims. This guide will give you the confidence to do it safely and effectively.
Here’s what we’ll cover:
✔️ Why regular nail trims are non-negotiable for your puppy’s health
✔️ Choosing the right tools (clippers vs. grinders)
✔️ A step-by-step training process to acclimate your puppy
✔️ Exactly where to cut to avoid the quick and prevent bleeding
✔️ What to do if you accidentally cut the quick
Let’s turn nail trimming from a nightmare into a non-event.
Why Trimming Your Puppy’s Nails is Crucial 🩺
This isn’t just about aesthetics; it’s about fundamental comfort and health.
- Pain Prevention: When nails touch the floor, it forces the toe to twist, putting constant, painful pressure on the foot and leg joints. This can lead to arthritis over time.
- Proper Posture & Gait: Long nails prevent a puppy from getting proper traction, leading to splayed feet and an unnatural, inefficient way of moving.
- Avoiding Injury: Overly long nails are prone to snagging on carpets, blankets, or grass, which can tear the nail painfully down to the quick.
- Scratch Prevention: Sharp nails can easily scratch human skin, especially children, and damage furniture and flooring.
Gathering Your Supplies: Choosing the Right Tools 🛠️
Having the right tool for the job (and your comfort level) is half the battle.
1. Guillotine Clippers ✂️
- How they work: A ring is placed over the nail, and a blade slides across to cut it.
- Best for: Small to medium-sized dogs with narrow nails.
- Pros: Simple mechanism, inexpensive.
- Cons: Can crush thicker nails, the blade gets dull quickly and must be replaced.
2. Scissor-Style Clippers ✂️
- How they work: They look like scissors with a notched blade.
- Best for: Medium to large dogs or puppies with thick nails.
- Pros: Provide good leverage for thicker nails.
- Cons: Can be bulky for very small puppies.
3. Nail Grinders/Dremels 🔄
- How they work: A rotating head files the nail down gradually.
- Best for: Puppies who are comfortable with noise and vibration; owners fearful of cutting the quick.
- Pros: Allows for very precise shortening, leaves a smooth edge, no risk of a major quick cut.
- Cons: The noise and vibration can scare some puppies, takes longer than clipping.
You will also need:
- Styptic Powder: This is your emergency stop-blood product. Do not start a trim without it.
- High-Value Treats: Small, soft, and delicious (cheese, chicken, hot dogs).
- A flashlight: Helpful for seeing the quick in dark nails.
Step-by-Step: How to Trim Your Puppy’s Nails Safely 🎬
The key is to break this down into tiny, positive steps over multiple sessions.
Step 1: Acclimate Your Puppy to Handling 🐾
Long before you bring out the clippers, make touching paws a positive experience.
- Daily: Gently handle your puppy’s paws while you’re cuddling on the couch. Give them a treat for letting you hold each paw.
- Press Lightly: Simulate the pressure of clippers by gently pressing on each nail with your finger. Treat and praise.
Step 2: Introduce the Tools 🔧
- Let them sniff the clippers or grinder (turned OFF) and give them a treat.
- Pair the sight of the tool with treats. Show the clippers = give a chicken piece.
- For grinders: Turn it on at a low speed across the room and feed treats. Gradually bring it closer over several days.
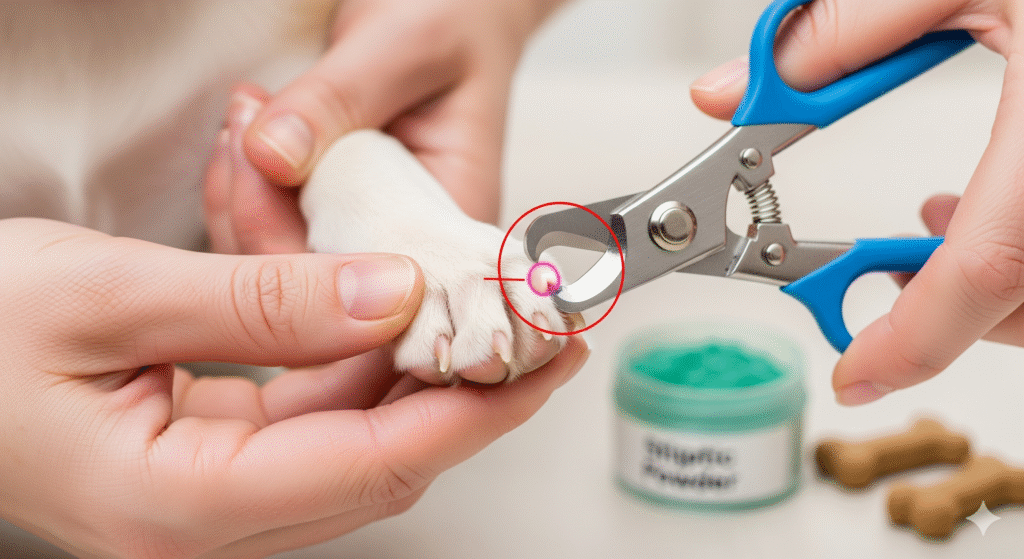
Step 3: Identify the Quick 🩸
This is the most important step. The quick is the pink, blood-filled vein that runs into the nail.
- On white/clear nails: The quick is easily visible as a pinkish triangle.
- On black nails: The quick is invisible. You must trim tiny slivers at a time.
Rule of Thumb: Only cut the curved hook-like part of the nail. Avoid cutting where the nail starts to straighten near the paw.
Step 4: The First Trim ✂️
- Get in position: Have your puppy sit in your lap or on a non-slip surface. Be calm and confident.
- Hold the paw firmly but gently.
- Make small, controlled cuts. For black nails, trim a tiny bit, then look at the cross-section. You will see a whitish/greyish center. When you see a small, dark pinkish dot in the center of that white circle, STOP. That is the beginning of the quick.
- Treat after every nail, or even after just holding the paw with the clippers.
What to Do If You Cut the Quick 🚑
It happens to everyone. Don’t panic.
- Remain calm. Your puppy will react to your energy.
- Apply styptic powder immediately. Take a pinch and press it firmly against the end of the nail for 30-60 seconds. The bleeding should stop quickly.
- Praise and treat your puppy! It’s crucial to end on a positive note, even after a mistake. Give them a bunch of treats and take a break.
- Do not scold your puppy or yourself.
Pro Tips for Success 🌟
- Keep sessions short: 2-3 minutes is plenty. It’s better to do one paw a day than to force a full trim.
- Trim after exercise: A tired puppy is a cooperative puppy.
- Enlist a helper: One person can hold and distract with a lick mat (like peanut butter), while the other trims.
- Focus on the back nails first: They often have shorter quicks and are easier to trim, building your confidence.
When to Call a Professional 📞
There’s no shame in asking for help. Seek a groomer or vet tech if:
- You are too anxious to try.
- Your puppy becomes extremely fearful or aggressive.
- The nails are severely overgrown, causing the quick to grow out very long.
Final Checklist for a Positive Nail Trim ✅
☑️ Acclimate puppy to paw handling daily
☑️ Have styptic powder and high-value treats ready
☑️ Identify the quick on each nail
☑️ Make small, conservative cuts
☑️ Stay calm and praise generously
☑️ End each session on a positive note
Starting grooming habits early helps your puppy accept handling and makes vet visits easier. While many owners focus on brushing and baths, dental care is one of the most important grooming habits to establish. The best time to start is when your puppy is still young and receptive to new experiences. For a gentle, step-by-step method to introduce tooth brushing and our recommended products, our guide on Brushing Puppy Teeth: When to Start & How walks you through the entire process. Good oral health prevents painful disease later in life